
Creating subdirectories in Ghost requires the use of content collections and most Ghost sites will eventually need to use them. Despite their necessity, content collections are fairly hard to understand and the documentation is not particularly clear on exactly when and how to use them. The configuration itself is done using a YAML file and that configuration has been parked under ‘Labs’ forever.
We’ve put together a step-by-step guide to help you create content collections for your Ghost site.
What are content collections in Ghost?
Content collections are just that, posts that you group together for a common purpose. For example, say you wanted to create a group of posts comparing your site to your competitors. These posts would not show up as regular blog posts, but instead, be linked to the main webpage of your site.
Take the old Mindspun footer, for example – the posts under the heading ‘Comparisons’ are content collections.

Each column is actually a separate collection, but we’ll stick with ‘comparisons’ as the example for this article.
When should I use content collections in Ghost?
Use content collections in Ghost when:
- You want to create a ‘subdirectory’ of content, i.e. all comparison pages under
/compare/. - You want those posts to only show in that subdirectory and not in their default location.
If you are creating a grouping of posts but you still want them to be in their default location, then use taxonomies.
How to use content collections in Ghost:
Here are the steps for creating a content collection in Ghost:
- Create an internal tag that will be used to tag posts in your collection.
- Add the collection definition to the routes section using
routes.yaml. - Tag posts using the internal tag.
- Create an ‘index’ page for the subdirectory.
- Use the collection in your theme.
Create an internal tag
Go to the Ghost admin panel and create an internal tag to indicate a post is in the collection. We’ll use #compare to denote our comparison pages.
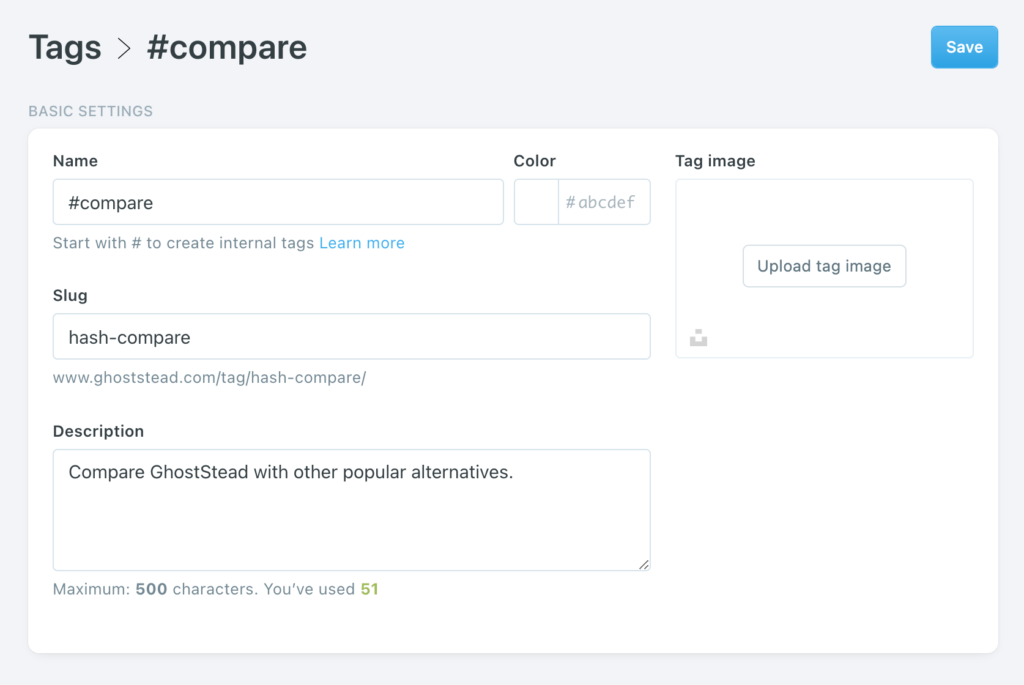
Make sure that the slug begins with the prefix hash- followed by the name. Ghost should fill this in automatically but it’s easy to overwrite. Note: we won’t use the description for this tag or any of the other attributes.
Update routes.yaml
This is the most complicated step of the entire process as it involves editing a configuration file manually and then re-uploading it.
Under the ‘Labs’ section of the admin panel, click the ‘Download current routes.yaml’ link.
(Note; The ‘Labs’ section will only show up if you’re the administrator of you Ghost site)

Open routes.yaml in a text editor, which should look like this:
routes:
  /:
   template: home
    data: page.home

collections:
  /blog/:
    permalink: /blog/{slug}/
    data: page.home

taxonomies:
  tag: /tag/{slug}/
  author: /author/{slug}/
This is the routes configuration that comes with a new Mindspun site – it defines a home page (the / route) and puts all posts under the /blog/ subdirectory by default. The default routes.yaml file for Ghost looks slightly different.
Modify the file by adding a ‘compare’ collection similar to the ‘blog’ collection. This is a YAML file so formatting is important. The complete file will look like this:
routes:
  /:
    template: home
    data: page.home

collections:
  /compare/:
    permalink:
  /compare/{slug}/
    filter: tag:hash-compare
  /blog/:
    permalink: /blog/{slug}/
A couple of things to note:
- Collections are processed in order so
/compare/must come before/blog/. - At this point, there is an entry in the sitemap for the URL for
/compare/but that page doesn’t exist. We’ll need to fix this later.
Upload the routes.yaml file back to your site by clicking Upload routes YAML as shown above.
Tag your content
The last step was the most complicated, this one is the easiest. Simply add the tag #compare to any post that you want to include in your collection. You can add additional posts to the collection at any time in the future.
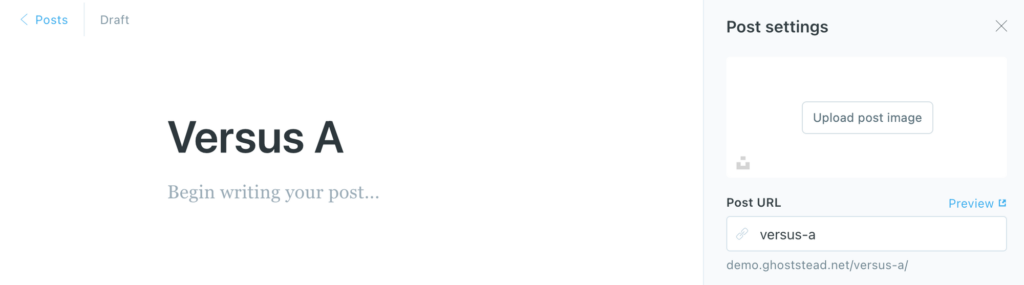
Once you’ve added the tag to at least one post, check to make sure that the page is located under /compare/. The Post URL in the left-hand sidebar will not show the correct URL – the editor is unaware of route settings.
The above post is now located at /compare/versus-a.
Create an ‘index’ page for your collection
As noted above, the sitemap contains an entry for /compare/ but that page doesn’t exist. (This is likely a bug in Ghost and may be fixed in future versions)
Create a page whose slug is ‘compare’ – this should be a true Ghost ‘page’ instead of a ‘post’.
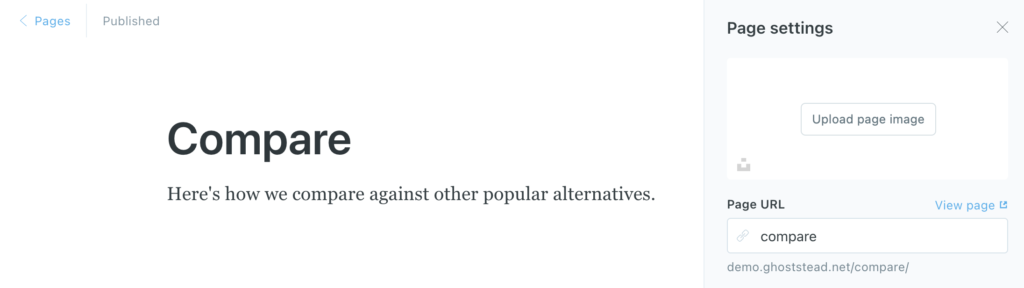
The contents of the page can be anything you like, but common usage is to create a listing of all pages in the collection (see below).
IMPORTANT: make sure you fill out the meta description for this page.
Use the collection in your Ghost theme
Now that you have a collection, use that collection in your site. This process can be as simple as putting a link in the navigation but usually you’ll want something more, such as:
- A list of links to all pages in the collection, such as those in the Mindspun footer shown earlier in this article.
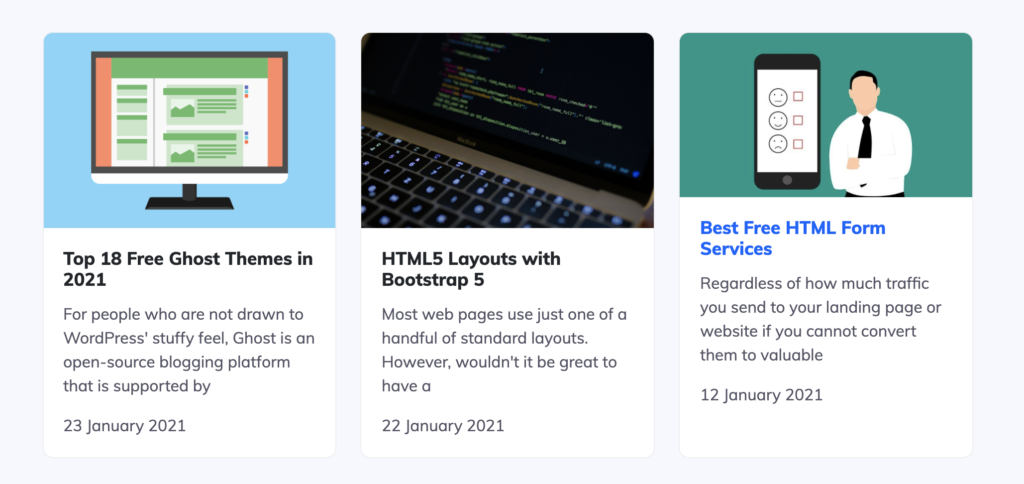
- An Index page of post cards like below.
Both of these examples work the same way, getting a list of posts from the API – based on particular criteria – then generating HTML from the result.
(These examples assume that you know how to update your Ghost theme.)
List of post links
Here are the relevant parts of the theme that shows the “Comparisons” column in the footer.
<div>
  <a href="/compare/">Comparisons</a></h5>
  <ul>
    {{#get "posts" limit="all" filter="tag:hash-compare" order="published_at asc"}}
      {{#foreach posts}}
        <li>
          <a href="{{url}}">{{title}}</a>
        </li>
      {{/foreach}}
    {{/get}}
  </ul>
</div>
All styling classes have been removed for clarity.
The Handlebars get helper generates a list of posts filtered by the tag #compare (which has to be specified as hash-compare since the hash tag (#) isn’t allowed).
The column title ‘Comparisons’ links to the index page ensuring the index page has at least one inbound link.
Index page of post cards
This method works just like the above, but with a couple of small tweaks. As an example, we’ll create a template for the ‘compare’ page.
Create a page template in your theme with the filename page-compare.hbs.
{{!< default}}
<header>{{> navbar }}</header>
<main>
  {{#post}}
    <section>
      <h1>{{title}}</h1>
      {{content}}
    </section>
  {{/post}}
  <section>
    <div>
      {{#get "posts" order="published_at desc"filter="tag:hash-compare"}}
        {{#foreach posts}}
          {{> "post-card"}}
        {{/foreach}}
      {{/get}}
    </div>
  </section>
</main>
{{> footer }}
Again, styling classes are omitted.
Page templates like this one are a little confusing, since it contains both ‘post’ and ‘posts’. The ‘post’ helper at the top refers to the page – in this case, the one whose slug is ‘/compare/’. The title and content attributes both come from that page.
The ‘posts’ helper refers to the posts tagged with #compare just like the previous example. The ‘post-card’ partial is used to display cards representing each post.
Conclusion
So now you know how to create subdirectories, and when to use them, you can easily improve your site’s navigation and UX design. You can also adapt this method for any grouping you want for your site.
If you found this article helpful, there are plenty more tutorials on the Mindspun blog!